|
|
|
ORNAMENT, PACKAGE TIES, ETC
 (My kids called these "Locker Buddies" and passed them to their friends in school.)
Cut used Christmas Cards in the shape of a mitten*. Use two, back to back (picture on the outside, both sides). Punch holes evenly around the edge. Either crochet, blanket stitch with embroidery floss, or use a darning needle (plastic for little children) or yarn with end dipped in glue) to sew around from top right wrist to top left wrist. Go through the same sewing process across the wrist on each side separately. Add a loop for hanging. Finish off. (If you prefer, you can glue together and trim with lace or rickrack.) Insert candy cane, christmas pick, anything. My daughters made these in Junior High for all their friends as Locker Buddies. What a hit they were.
A great project for the scouts, or groups, to give to nursing homes, hospitals, senior centers, etc.
These also make great package decorations and have that little added something.
*Mittens can be traced around your child's hand making it more personal. Great gift for grandparents (add bookmarks) and teachers (add chalk). You can use any shape you wish. We used a boot, a stocking, a circle, diamond, heart or any simple shape. When doing the mitten, keep the thumb closer to fingers. Just need a bump there. Easier to sew.
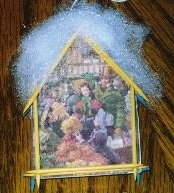
HOUSE ORNAMENT
Cut two Christmas Card areas in the shape of a house (flair the sides out slightly toward the roof) with the sides a little shorter than a toothpick. Same for width and roof line. Glue back to back, right side out. Trim if necessary. Glue toothpick (round) along bottom edge and roof line. Glue toothpick on sides of house on top of other toothpicks. Repeat process. When dry, do same on reverse. Put hanger on top and embellish anyway you like. Accent your picture with glitter. Add jingle bells or miniature greenery, etc. These are very cute and great for kids to make. They also are perfect as a package tie on.
KISSING BALL OR CHRISTMAS TREE BALL
Draw circle on a piece of cardboard or back of a card with compass and allow point in center to be marked. This is your pattern piece. Trace around this pattern piece on card centering over a picture you like. Cut out 4, 8, 12, 16, or 20 circles, depending on type of ball you prefer. I prefer 20.
Fold up one side of ball to center mark and reverse fold to other side. Repeat two more times on each circle. Each circle will be divided into thirds equally. The part on the picture of card will be the shape of a triangle. Apply glue to folded up edge of circle and attach it to another folded up edge on another circle. Add another circle until you have formed a ball. Add a ribbon for hanging, and embellish anyway you like.
I have done them with the edges glued and glitter sprinkle on, glitter highlighting something in the picture. Small greenery attached. Tassels, pearls, ribbons and bows, etc. When I make a larger one I add mistletoe and make it a kissing ball.
DECOUPAGE
Trunks, storage boxes, plant pots, wall-hanging plaques, wooden or paper mache boxes for keepsake keepers, tv trays, etc.
3D DECOUPAGE - If you have 2, 3 or 4 of the same card, you can always try 3D Decoupaging them in shadow box frames or as pins if the picture is small enough.
Try using clear contact paper to cover the image, making sure there are NO wrinkles or air bubbles, then soak the whole thing in water. The paper will "dissolve" but a semi-transparent copy of the image will stay on the contact paper. You will have a flexible copy that can be glued to canisters, round clear ornaments, or elsewhere.
SCRAPBOOK USE
You can cut the design out and put them on scrapbook pages along with your pictures. That way they don't take up as much room as a full card and they will add a cute touch to your pictures. You can use the left-over frames of cards already cut out by inserting favorite photos, etc.
ORNAMENT TO RETURN TO SENDER
Cut a circle of the picture, crochet an edging or glue ruffle, rickrack, lace to edge or glue on to a premade lace doily. They make great gift tags, or ornaments this way. On the reverse, add the poem:
Last year this card you sent to me,
With wishes Merry as can be,
To keep those wishes onward flowing,
Now back to you this card is going,
Changed a bit by a loving hand,
In hopes your holidays are GRAND!
ORNAMENTS
Cut around the image, singe the edges and decoupage on small wood pieces for ornaments.
CHAIRS FOR MR & MRS SANTA/SNOWPEOPLE
Use a small childs chair and decoupage cut or torn cards (some cards are very thick and you may need to peel the paper so they are thinner) or wrapping paper, and completely cover the chair, overlapping the images and then seal the whole thing with a few coats of clear spray.
GUARDHOUSES
Cover cardboard "Guard Houses" made of empty round oatmeal boxes) for your collection of NutCrackers.
CENTER PIECES
Use oatmeal boxes covered as center pieces, small vases fit in them for fresh flowers. Fill with candies, or fill with garland or grass so some "spills" over the top edge (use a set of battery operated lights in with the grass for effect) and display a special or favorite ornament in the center.
RECYCLED CHRISTMAS AND OTHER CARDS
Some of the fancier cards no matter what occasion can be used to make ornaments for all occasions. I have cut out embossed parts of cards and decoupaged them onto clear glass ornaments let dry. With a tiny brush put a little bit of decoupage glue around the picture, not on the picture, then sprinkle glitter dust on. Tap off the excess. I then use a gold paint pen to write the birthday, anniversary or other occasion on the ball with the recipiants name. These are very pretty and elegant if you take your time in the decorating.
Thanks Marie for this great idea.
CD SUNCATCHERS
You carefully liquid nail two CD's together back to back so the silver side is out. You then cut out a picture from the card for each side large enough to cover the hole in the middle or larger. Glue these to the CDs on both sides. You can use liquid nails if you are really careful or just use white Elmers glue. Heat a large needle over a candle until it is hot enough to push through both CD's to make a hole for a hanger. Use fishing leaders with swivels to hang so they can spin and cast beautiful lights around the room. You can do the same with any greeting cards, wrapping paper, or even pictures from magazines.
(NOTE: Great gift for a shut-in or as a get well card, especially for children.)
FRAME IT
Many cards fit into a 5x7 frame or use a 5x7 mat in a larger frame. Add flowers or ribbons, pearls and lace, etc., to the outside of the picture frame. Mat can be embellished as well. This is a wonderful way to keep a special card from a special person. The inside of the card can be glued on the back of the frame or use a larger frame and from both parts.
PINS
Cut your design out and mod podge it onto a thicker cardboard (or fun foam) piece. Let it dry well and paint around the edges or cover with ribbon and add a pin back to it. These work well with smaller designs.
MAGNETS
Same concept as pins (above) and substitute a magnet for a pinback.
COASTERS
Cut into circles or squares. Laminate the cards to make coasters.
BOOKMARKS
We all have lovely greeting or birthday cards, or pretty wrapping paper, that we don't want to throw out. Make them into bookmarks instead. Cut to size and shape desired. Put a single drop of a favorite essential oil in an unnoticed spot on the paper and seal in a bag overnight to let the scent permeate the bookmark. If you don't want to run the risk of the bookmark being stained by the oil, simply seal overnight in a plastic bag with a piece of cotton wool to which you've added a drop of essential oil. You can make several of these for your favorite places in your Bible. If desired, add a ribbon tail and a bead on the end. NOTE: These can also be crocheted around. Take a small hole puncher put holes around cut out shape. Starting at the top of the shape use a crochet hook and thread make a stitch in the hole then pull thread up take a stitch. Do this about two times in each hole. Continue around shape (and if you prefer, go around again). When you reach the top of the shape you can make a chain and then put a tassle at the end.
GIFT TAGS
Tear the backs off the cards (save these for when you need to make a pattern or use the writing inside) and cut out the fronts using old pinking shears, plain scissors or fancy edgers. You will be able to get several tags from one card. Punch a hole in the top of the tag and put a string of crochet thread, embroidery floss, yarn, etc. NOTE: Package them 12 to a bag and sell at the school bazaar to raise money.
PLACEMATS
Sandwich the cards facing out cut in various shapes and put on top of each other in a beautiful collage between two pieces of the vinyl that you iron onto fabric to make raincoats. You can cut the vinyl in oval, circle or rectangular shape. This vinyl is available at most fabic or hobby craft stores.
BOX
Cut 6 cards in equal size. (Use two cards for each section if you want the inside as pretty as the outside.) Punch small holes around the edges. Sew or crochet together with yarn the sides and bottom. Attach lid and sew around three sides and attach fourth side to box for a lid that is hinged in the back. Mod Podge for stability and protection.
PILLOW BOXES
See Carol Duvall's instructions at HGTV - http://www.hgtv.com/carol/cds-437.html
PLANTER
See instructions for box (above) omitting top. Insert a small potted plant. Make sure it does NOT have a drainage hole. Shellac or Mod Podge.
CANDY DISH
See instructions for planter/box (above) omitting top. You can round the top of each side piece (keeping all sides the same) or cut them pointed (as a house roof). Widen the top of the sides (i.e., bottom of side piece is 2", wide top of side piece would be 3" or 4"). When sewn together, the sides will slope out as a bowl or dish. NOTE: These can be made with 6 sides, but adjust your bottom piece to match. Shellac or Mod Podge.
TRAY
Use old cards in a large (under the glass) wooden picture frame. Add handles to turn it into a tray.
Please send your used card fronts that can be attractively trimmed to fit our 5"x7" card backs, and that do not have writing on the back of the card, to:
Would you like to share an idea for recycled cards with us? Please e-mail me and I'll include it on this page.